.png)


How to Change Folder Background in Windows 7
We like to customize folder and drive’s icon, color, view to give it a unique look. What about changing folder background? Usually we use software to do that. But here we’ll change the folder’s background without any software. To do so firstly we should know, what is the “desktop.ini” and how it works?

Desktop.ini is the file where system assigns the values of icon, info, background image source etc. The folder will gives info about itself or a thumbnail view which has the proper desktop.ini file. It is a hidden system file and it's possible to show by CASE: 2 step: 2 in this article. Nothing to worry about it because the system can automatically create a new one if the file is being damaged or absent. It just needs a reboot of the system.
The following tutorial will show how to set an image as the background in a folder. This tutorial is divided into two CASEs according two different conditions.
4. If you want a shadow effect for text give ShadowedText=1 and for applying same image to all sub directories give Recursive=1 like this.
5. After creating, save the text file then rename it to desktop.ini and restart your PC.
The “IconArea_Image=” (CASE: 1 step 3) describes the source path of the background-Image. You should not select an image source path from removal disk. If you are setting up the image of your removal drive then your background-image source should describe a path of that drive.
Sometimes a message could come showing replacement of desktop.ini file. That means your working folder already has same file. It is better to cancel the replacement of this file and follow the CASE: 2.


Desktop.ini is the file where system assigns the values of icon, info, background image source etc. The folder will gives info about itself or a thumbnail view which has the proper desktop.ini file. It is a hidden system file and it's possible to show by CASE: 2 step: 2 in this article. Nothing to worry about it because the system can automatically create a new one if the file is being damaged or absent. It just needs a reboot of the system.
The following tutorial will show how to set an image as the background in a folder. This tutorial is divided into two CASEs according two different conditions.
CASE 1: Creating a desktop.ini file:
1. Go to the folder which background image will be changed.
2. Create a new text file and open to edit it.
3. Copy following two lines and paste them to the text file.
2. Create a new text file and open to edit it.
3. Copy following two lines and paste them to the text file.
[AveFolder] IconArea_Image="C:\Users\user_name\my pictures\image.jpg" 4. If you want a shadow effect for text give ShadowedText=1 and for applying same image to all sub directories give Recursive=1 like this.
[AveFolder]IconArea_Image="C:\Users\user_name\my pictures\image.jpg"ShadowedText=1Recursive=1 |
| ShadowText & Recursive |
5. After creating, save the text file then rename it to desktop.ini and restart your PC.
The “IconArea_Image=” (CASE: 1 step 3) describes the source path of the background-Image. You should not select an image source path from removal disk. If you are setting up the image of your removal drive then your background-image source should describe a path of that drive.
Sometimes a message could come showing replacement of desktop.ini file. That means your working folder already has same file. It is better to cancel the replacement of this file and follow the CASE: 2.
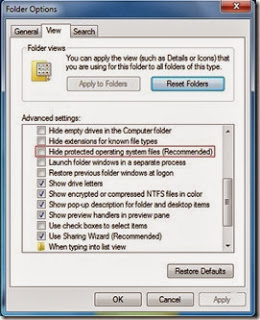
CASE 2: Editing desktop.ini: 1. Go to Folder Option from Control panel or from explorer’s menu bar>folder option.

5. After creating, save the text file then rename it to desktop.ini and restart your PC.
The “IconArea_Image=” (CASE: 1 step 3) describes the source path of the background-Image. You should not select an image source path from removal disk. If you are setting up the image of your removal drive then your background-image source should describe a path of that drive.
Sometimes a message could come showing replacement of desktop.ini file. That means your working folder already has same file. It is better to cancel the replacement of this file and follow the CASE: 2.
CASE 2: Editing desktop.ini: 1. Go to Folder Option from Control panel or from explorer’s menu bar>folder option.
2. Select view tab and scroll down to find out hide protected operating system file and uncheck it. It is important to mark Show hidden files, folders and drives first from this view tab.

3. Find out the desktop.ini in the current directory and open it with a text editor, like: notepad.
4. Paste the lines described in CASE: 1 step: 3, just after the [.ShellClassInfo]’s description lines.

5. Save and exit from desktop.ini
6. Restart your PC to take an effect on OS.
Important: The background image won’t change properly until restart your computer.
6. Restart your PC to take an effect on OS.


0 comments: